
Intro
Choosing a bicycle helmet for a child can feel more complicated than selecting a simple size from a shelf. Children’s head shapes vary, helmet brands use different sizing systems, and a helmet that looks secure may still move during a fall. The goal is not merely to find a helmet marked for a child’s age; it is to select a suitable model, measure the child’s head, and confirm that the helmet remains correctly positioned during normal movement.
A properly fitted helmet should sit level, cover the forehead without obstructing vision, and remain stable when the child looks up, down, and from side to side. A calm, step-by-step fitting routine helps protect the child and can make wearing a helmet more comfortable and acceptable.
Highlights
Measure head circumference rather than relying on age alone, because helmet sizing varies by brand.
The helmet should sit level and squarely, with the front low enough to protect the forehead without covering the eyes.
A snug fit is stable but not painful; the shell should not rock, slide, or rotate when the child moves.
Correct strap positioning matters as much as the helmet’s labeled size.
Replace a helmet after a significant impact, even if there is no obvious external damage.
Why correct helmet size and fit matter
A bicycle helmet is designed to work in a specific position on the head. If it is too large, it may shift during riding or fail to stay over the areas it is intended to protect. If it is too small, it may sit high, leave too much of the forehead exposed, create pressure points, or encourage the child to remove it because it is uncomfortable. An incorrectly positioned helmet cannot provide the same protection as one that is appropriately sized and secured.
Fit also affects behavior. Children are more likely to wear a helmet consistently when it feels comfortable, does not obstruct their vision, and does not pinch the skin beneath the chin. Treat fitting as a practical safety skill rather than a one-time shopping decision. Recheck the fit as the child grows, after changing hairstyles or headwear, and whenever the helmet has been used for a long period.
Age can offer a broad starting point, but it is not a reliable sizing method. Two children of the same age may have different head circumferences, and the internal shape of two helmets with the same nominal size may differ. The manufacturer’s measurement range and the child’s actual head measurement should guide the selection.
Measure the child’s head before buying
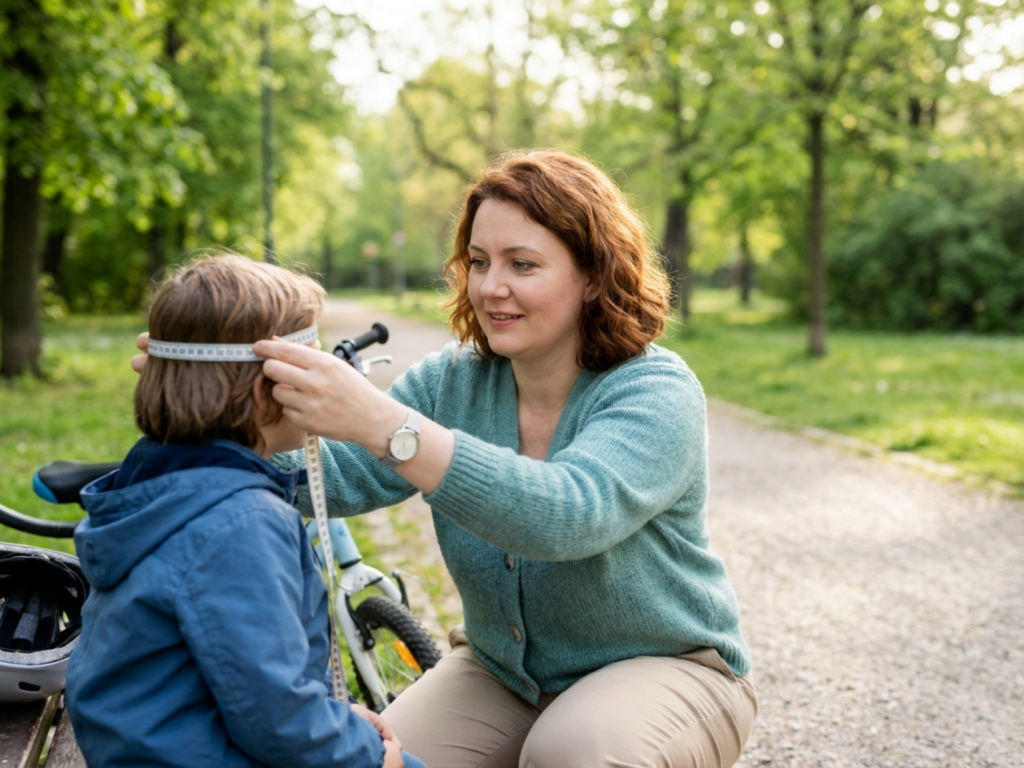
Use a flexible, non-stretch measuring tape if available. Place it horizontally around the child’s head, just above the eyebrows and ears. Keep the tape level from front to back and avoid pulling it so tightly that it compresses the skin. Record the circumference in the unit used on the helmet’s packaging, usually centimeters or inches. If the measurement falls near the boundary between sizes, repeat it to confirm accuracy and compare the result with the manufacturer’s instructions.
Measure the head in the condition in which the helmet will normally be worn. Bulky hats, hooded garments, clips, or substantial hair volume can change the fit, but a bicycle helmet generally should not be worn over a thick winter hat because this may interfere with stability and strap adjustment. For a child with a medical device, a cranial orthosis, a recent scalp procedure, or an unusual head shape, ask the child’s healthcare professional about appropriate helmet selection rather than improvising.
When shopping in person, bring the child if possible. A measurement can identify the likely size range, but the helmet’s shape, padding, adjustment mechanism, and strap geometry must still work for that child’s head. When shopping online, check the exact model’s size chart; do not assume that a small size from one brand is equivalent to a small size from another.
Choose the size using measurement, not age alone
Start by matching the measured circumference with the helmet manufacturer’s stated range. Select a helmet that accommodates the child’s measurement without requiring the adjustment dial or internal fit system to be forced to either extreme. The helmet should not be purchased oversized with the expectation that the child will grow into it. Excess space can allow movement and may make the helmet sit too high.
Children need helmets designed for the activity they are doing. A helmet intended for ordinary bicycling may not be interchangeable with equipment designed for another wheeled sport or a different type of impact. Read the product instructions and use the helmet only for the activities covered by its labeling. Families comparing products may also find guidance on certified helmets for wheeled sports useful when evaluating equipment for cycling and related activities.
Inspect the helmet before purchase or first use. Avoid a product with cracks, crushed foam, missing components, damaged straps, or a retention system that does not operate smoothly. Confirm that the fit system can be adjusted without creating pressure or gaps. Decorative additions, aftermarket accessories, or modifications that are not approved by the manufacturer may alter the helmet’s performance or fit, so do not attach them casually.
Position the helmet correctly on the head
Place the helmet directly on the child’s head and have the child look straight ahead. The helmet should sit level and squarely, not tilted backward or pushed far forward. Its front edge should cover the forehead while leaving the child’s field of vision clear. The helmet should rest securely without being perched on the crown of the head.
Adjust the internal retention system, if present, until the helmet feels snug around the head. The shell should remain centered when the child turns the head. Padding should contact the head evenly without creating a painful focal pressure point. Some children have a natural preference for wearing the helmet slightly tilted, but a visibly backward tilt may expose the forehead and should be corrected.
Next, position the side straps so they meet just below and slightly in front of each ear, forming a stable configuration on both sides. The chin strap should lie flat against the skin beneath the chin. It should be snug enough to prevent the helmet from lifting or sliding, but it should not cause choking, difficulty swallowing, or skin compression. A parent or caregiver should perform the initial adjustment, then teach the child how to recognize a properly closed and positioned strap.
Perform practical fit checks at home
After adjusting the helmet, use several simple checks. These checks complement, rather than replace, the manufacturer’s instructions.
- Movement check: Hold the helmet gently and ask the child to shake the head from side to side and nod. The helmet should remain centered and should not slide over the eyes or rock substantially.
- Look-up check: Ask the child to look upward. The child should be able to see the front edge of the helmet, while the helmet remains low enough to cover the forehead.
- Strap check: Confirm that the side straps meet below the ears and that the chin strap is flat and comfortably snug. The buckle should be closed and positioned away from the underside of the jaw.
- Comfort and communication check: Ask whether there is pinching, pressure, rubbing, or difficulty hearing and seeing. Comfort complaints should be investigated rather than dismissed as reluctance.
- Stability check: With the child seated normally, gently attempt to move the helmet forward, backward, and to each side. Minor padding movement may occur, but the shell should not shift enough to expose the forehead or obstruct vision.
Have the child repeat the checks after riding for several minutes. Sweat, movement, and strap slippage can reveal problems that are not obvious during the first fitting. The helmet should be checked before every ride, especially when more than one caregiver helps the child prepare.
Recognize an outgrown or unsuitable helmet
A helmet may need replacement because the child has grown, because the helmet has been damaged, or because its adjustment range no longer produces a secure fit. Signs of an outgrown helmet include a shell that sits high despite correct adjustment, exposed forehead, pressure marks, persistent complaints of tightness, or straps that cannot be positioned correctly below the ears.
Replace a helmet after a significant impact or collision, even when the shell appears intact. Impact-absorbing materials can be compromised internally without an obvious visible crack. Also replace a helmet when the manufacturer recommends replacement because of age, deterioration, or a discontinued design, and follow the product documentation when available.
Do not pass a used helmet to another child without knowing its history. A secondhand helmet may have experienced an impact, may be missing parts, or may no longer fit the new wearer’s head shape. If the helmet’s history is uncertain, choosing a new, correctly sized product is the safer option.
For broader pedestrian and bicycle safety, combine helmet use with adult supervision appropriate to the child’s developmental abilities, safe riding locations, visible clothing where appropriate, and instruction in traffic awareness. A helmet reduces the risk of some head injuries but does not make unsafe riding environments safe.
Make fitting routine and supportive
Children may resist helmets because of sensory discomfort, heat, appearance, or a desire for independence. A supportive approach is usually more effective than criticism. Offer a limited choice between suitable helmets, let the child practice fastening the buckle under supervision, and use consistent language such as “level, snug, and secure.” Adults should model helmet use whenever they ride with children.
Fit the helmet before the bicycle is moving, in a well-lit location where the caregiver can see the straps and buckle. Avoid rushing at the doorway. If the child reports pain, numbness, headache, skin irritation, or persistent pressure, remove the helmet and reassess the size and shape. Continued discomfort warrants advice from a healthcare professional or an appropriately trained helmet-fitting service.
Professional input is particularly valuable for children with craniofacial differences, neuromuscular conditions affecting head control, sensory processing concerns, or a history of head or neck injury. A healthcare professional can help determine whether additional evaluation is appropriate; this article cannot assess an individual child’s medical needs.
Safety warnings
- Do not choose a helmet several sizes too large so the child can grow into it.
- Do not wear a bicycle helmet tilted backward or with the forehead substantially exposed.
- Do not use a helmet with cracks, crushed foam, damaged straps, or an unknown impact history.
- Do not modify the helmet or add unapproved accessories that could change its fit or protective function.
- Seek urgent medical care after a serious crash or when a child has concerning symptoms following a head impact.
Tools & Assistance
- Flexible soft measuring tape
- The exact manufacturer size chart and fitting instructions
- A well-lit mirror for checking position and strap alignment
- A local bicycle shop or helmet-fitting service
- The child’s healthcare professional for medical or anatomical concerns
FAQ
Can I choose a helmet based only on my child’s age?
No. Age can provide a rough starting point, but head circumference and the manufacturer’s size range are more reliable because children and brands vary.
How tight should the chin strap be?
It should lie flat beneath the chin and be snug enough to prevent the helmet from moving, without causing pain, choking, swallowing difficulty, or significant skin compression.
Should a child wear a winter hat under a bicycle helmet?
A thick hat can change the fit and reduce stability. Follow the helmet manufacturer’s instructions and consider thin, compatible headwear only if it does not interfere with the helmet’s position or straps.
What should I do if the helmet shifts when my child shakes their head?
Stop and readjust the retention system and straps. If the helmet still moves substantially, try another size or model rather than relying on a loose fit.
When should a child’s helmet be replaced after a crash?
Replace it after a significant impact, even if there is no visible damage. Also replace it when it is cracked, deteriorated, missing parts, or no longer fits correctly.
Sources
- HealthyChildren.org / American Academy of Pediatrics — Bike Helmets for Kids: Parent FAQs
- Children's Hospital of The King's Daughters — Helmet Safety | Pediatric Health Library
- Indiana University School of Medicine Safety Store — Bike Helmet Fitting Tips and Guidelines
Disclaimer
This article provides general safety information and is not a diagnosis or substitute for individualized medical advice. Consult a qualified healthcare professional for concerns about a child’s head shape, medical condition, injury, or symptoms after a crash.












Please log in to leave a comment.