
Intro
When an infant becomes unresponsive or is not breathing normally, every second matters. Infant cardiopulmonary resuscitation, or CPR, is designed to keep oxygenated blood moving to the brain and vital organs until emergency care takes over. The technique is different from adult CPR because an infant has a smaller chest, a more delicate airway, and a different pattern of injury risk.
This article explains the core steps in a calm, practical way: how to check for responsiveness, when to call emergency services, how to place your fingers for compressions, how rescue breaths fit in, and what to do if choking may be involved. It is educational information, not a substitute for hands-on training or emergency medical guidance.
Highlights
Infant CPR is used for an infant who is unresponsive and not breathing normally; it is not for a baby who is crying, moving, or breathing well.
The first priorities are scene safety, a quick responsiveness check, and immediate activation of emergency help.
Infant compressions use two fingers on the lower half of the sternum, with firm depth and full chest recoil.
Rescue breaths are gentle and should produce visible chest rise without forceful inflation.
If you suspect choking, the response may differ, but an unresponsive infant still needs CPR and emergency care right away.
What infant CPR is meant to do
Infant CPR is a temporary life-saving intervention. Its goal is not to cure the underlying problem, but to maintain a minimal flow of blood and oxygen when the heart or breathing has stopped or become ineffective. In infants, respiratory causes are common, so ventilation is especially important. That is why infant CPR combines chest compressions with rescue breaths rather than relying on compressions alone.
In practical terms, CPR is considered when an infant is unresponsive and not breathing normally. Agonal gasps, which are occasional, irregular breaths, do not count as normal breathing. If you are unsure, treat the situation as an emergency and get help immediately. A dispatcher or emergency clinician can guide you while you begin care.
It is also useful to remember that CPR is a bridge to definitive treatment. An infant may need airway support, oxygen, medication, fluid resuscitation, or advanced life support after the initial response. Early action simply improves the chance that those treatments will matter.
How to check the infant and call for help
Start by making sure the environment is safe for you and the infant. Then check for responsiveness by gently tapping the foot or rubbing the back and speaking loudly enough to see whether there is any reaction. Avoid shaking the infant. If there is no response, look quickly for normal breathing. This assessment should take only a few seconds.
If the infant is unresponsive and not breathing normally, call emergency services immediately or ask another person to do it. If you are alone and have a phone nearby, use speaker mode so you can keep your hands free. If someone else is present, direct that person clearly: call emergency services, get an AED if one is available, and return right away. Time matters, but so does staying calm and organized.
During this early step, gentle positioning matters. Keep the airway in a neutral, slightly extended position rather than overextending the neck. Good handling is part of safe baby handling techniques because an infant’s airway can narrow easily if the head is flexed too far forward or tipped too far back.
The correct infant chest compression technique
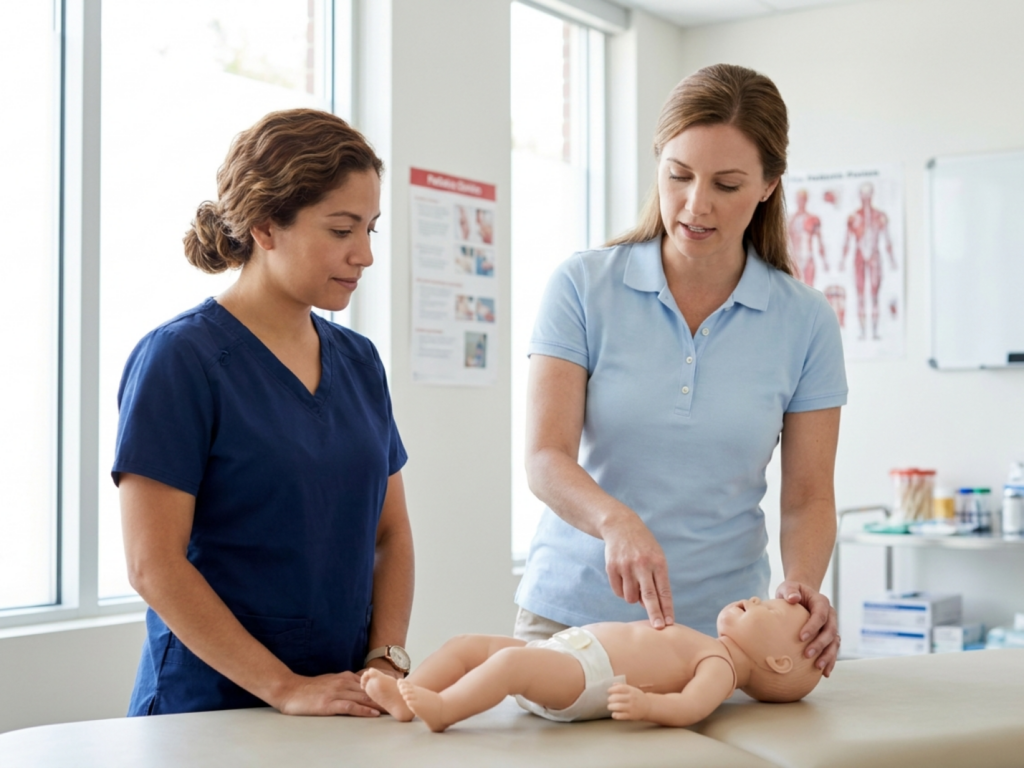
To begin compressions, place the infant on a firm, flat surface. Use two fingers in the center of the chest, just below the nipple line on the lower half of the sternum. Compress straight down, not toward the ribs, and allow the chest to fully recoil after each compression. Full recoil is important because the heart refills between compressions.
The recommended compression depth is about one-third of the chest’s anterior-posterior diameter, which is roughly 1.5 inches or 4 centimeters for many infants. The rate should be about 100 to 120 compressions per minute. A steady rhythm helps preserve blood flow, and shallow or hesitant compressions are less effective. At the same time, excessive force can cause injury, so technique matters as much as effort.
Keep pauses short. Any interruption in compressions drops blood flow quickly, so try to resume as soon as possible after breaths or a handoff to another rescuer. If you have formal training, use the hand position and compression sequence taught in your course and follow local protocol if it differs from your general reference.
Rescue breaths and the 30:2 cycle
Infant CPR includes rescue breaths because infants often arrest from breathing failure rather than a primary heart problem. To give a breath, open the airway gently, create a seal over the infant’s mouth and nose, and deliver a small puff of air over about one second. The breath should be gentle, just enough to see the chest rise. Blowing too hard can force air into the stomach and make ventilation less effective.
In basic infant CPR, the common cycle is 30 compressions followed by 2 rescue breaths for a single rescuer. If more than one trained rescuer is present, follow the training and protocol you learned, since some courses use a different compression-to-breath ratio in two-rescuer care. The key idea is to keep the sequence organized and consistent rather than improvising in the moment.
If the chest does not rise, reposition the head and try again. Do not spend long trying to perfect each breath if the infant remains in distress; return to compressions quickly and continue until emergency help arrives or the infant shows clear signs of life.
When choking changes the response
Choking and cardiac arrest are not the same thing. A conscious infant who is coughing, crying, or making meaningful sounds may have a partial airway obstruction, and the approach is different from CPR. That is where infant choking prevention and immediate recognition become important. If the infant is responsive and the airway problem seems to be worsening, seek urgent help and follow an age-appropriate choking protocol from a trusted medical source or dispatcher.
If the infant becomes unresponsive, stop thinking in terms of choking first and start CPR. At that point, the priority is circulation and ventilation. If you see an object in the mouth, remove it only if it is visible and easy to grasp. Do not do blind finger sweeps, because they can push the obstruction deeper. If the infant vomits, briefly turn the head to the side to clear the airway, then resume the resuscitation sequence.
This distinction can be emotionally difficult in real life, especially for a frightened caregiver. A simple rule helps: responsive airway problem, use choking guidance; unresponsive and not breathing normally, start CPR and call emergency services.
After the emergency and how to prepare in advance
Even when CPR is done correctly, the infant still needs urgent medical evaluation. Emergency clinicians will look for the cause of the event, whether it was respiratory, infectious, cardiac, traumatic, metabolic, or related to choking. Do not assume the crisis is over if the infant starts breathing again. Continued observation and transport to care are still important.
The best preparation is practice. A formal infant CPR class through a hospital, community program, or professional training organization can make the steps feel much less abstract. Hands-on manikin practice is especially helpful for learning the right depth, rhythm, and breath volume. Many families also keep a simple emergency plan: local emergency number, address posted near the phone, and a clear role assignment for caregivers.
If there are multiple adults caring for the baby, review the steps together and refresh them periodically. Confidence comes from repetition, not from perfection. In an emergency, a trained caregiver who starts early is doing something meaningful, even while waiting for advanced care.
Urgent safety reminders
- Call emergency services immediately if an infant is unresponsive or not breathing normally.
- Do not shake the infant or delay action while searching for a diagnosis.
- Use gentle rescue breaths; forceful blowing can be harmful.
- Do not perform blind finger sweeps in a suspected choking event.
- Keep compressions firm, centered, and continuous with minimal pauses.
Tools & Assistance
- Local emergency number saved in your phone and posted at home
- An infant CPR class from a hospital, community program, or certified trainer
- A device for calling on speaker so your hands stay free during an emergency
- An AED if available in the home, workplace, or public setting, used according to dispatcher and device instructions
FAQ
Is infant CPR the same as adult CPR?
No. Infant CPR uses different hand position, smaller compression depth, and gentle rescue breaths because an infant’s chest and airway are much smaller and more delicate.
What if the infant is gasping?
Gasping is not normal breathing. Treat it as an emergency, call for help, and start CPR if the infant is unresponsive and not breathing normally.
How hard should compressions be?
Compress about one-third of the chest depth, which is roughly 1.5 inches or 4 centimeters for many infants, while allowing full recoil after each compression.
Should I stop CPR if the infant coughs or moves?
If the infant shows clear signs of normal breathing or responsiveness, pause and follow emergency instructions. If you are unsure, continue until a clinician or dispatcher tells you otherwise.
Sources
- MedlinePlus — CPR - infant: MedlinePlus Medical Encyclopedia
- American Heart Association / Circulation — Part 11: Pediatric Basic Life Support and Cardiopulmonary Resuscitation Quality
- American Heart Association — Infant CPR
Disclaimer
This article is for educational purposes only and does not replace emergency care, hands-on CPR training, or individualized medical advice. If an infant is unresponsive or not breathing normally, call emergency services immediately.
















Please log in to leave a comment.