Intro
Sterilizing baby bottles can feel like one more high-stakes task in an already full day, especially when you are caring for a newborn, a premature infant, or a baby with medical vulnerabilities. The reassuring news is that in the US, most healthy full-term infants do not need every bottle sterilized after every feeding if bottles are washed thoroughly and dried completely. Still, sanitizing feeding items can be important in specific situations, and knowing the correct methods helps reduce microbial contamination without adding unnecessary stress.
This guide explains how US families can clean, sanitize, dry, and store bottles using evidence-based methods from pediatric and public health sources. It also clarifies the difference between cleaning and sanitizing, when extra precautions are reasonable, and how bottle hygiene fits with safe formula preparation.
Highlights
Cleaning and sterilizing are not the same: cleaning removes milk residue and many germs, while sanitizing further reduces microorganisms after cleaning.
For many healthy full-term babies, careful washing plus complete drying may be enough; extra sanitizing is often advised for infants younger than 2 months, premature babies, or babies with weakened immune systems.
Common US options include boiling, electric steam sterilizers, microwave steam systems, dishwasher sanitizing cycles, and correctly diluted bleach solutions.
Bottles must be taken apart, washed first, handled with clean hands or clean tongs, dried fully, and stored in a clean covered area.
Ask your pediatrician or another qualified clinician if your baby has a history of prematurity, immune compromise, gastrointestinal illness, thrush, recurrent infections, or complex feeding needs.
Sterilizing, sanitizing, and cleaning: what the terms mean
In everyday parenting language, people often say “sterilize bottles” to mean making them as safe as possible for a baby. Medically and technically, true sterilization means eliminating all forms of microbial life, including bacterial spores. Most home bottle routines are better described as sanitizing, which greatly reduces the number of microorganisms to a safer level. That distinction matters because home methods such as boiling, steaming, and bleach-solution treatment are intended to lower infection risk after proper cleaning, not to create a sterile surgical environment.
Cleaning is the first and non-negotiable step. Milk residue, formula residue, and biofilm can protect microorganisms from heat or chemicals. If a nipple or bottle still has visible film or trapped milk, sanitizing will be less effective. A good routine is: separate all bottle parts, rinse soon after feeding, wash thoroughly with hot soapy water or a dishwasher, then sanitize when indicated.
In the US, the Centers for Disease Control and Prevention and pediatric guidance emphasize that sanitizing is particularly useful for higher-risk infants and for items that are difficult to clean completely. For low-risk situations, a dishwasher with hot water and a heated drying or sanitizing setting may be adequate for many families, provided the items are dishwasher-safe and the manufacturer’s instructions allow it.
When should US families sterilize bottles?
For many healthy full-term infants living in homes with a safe water supply, bottles do not necessarily need to be sanitized after every single use once they are cleaned well. However, additional sanitizing is commonly recommended in several circumstances because newborn immune function is still developing and some babies are more susceptible to invasive infection.
- Consider daily sanitizing if your baby is younger than 2 months.
- Consider daily sanitizing if your baby was born prematurely or has a low birth weight history.
- Consider daily sanitizing if your baby has a weakened immune system, significant chronic illness, or a clinician has advised extra infection precautions.
- Sanitize new bottles, nipples, pacifier-like feeding parts, and pump components before first use, unless the manufacturer gives a different instruction.
- Sanitize after illness in the household, after a bottle part falls into an unclean area, or when you are concerned cleaning was incomplete.
If your baby has special medical needs, including a feeding tube, cleft palate feeding system, cardiac disease, immunodeficiency, chemotherapy exposure, or prolonged NICU history, ask the care team for individualized instructions. This is also relevant if you use powdered formula, because powdered formula is not sterile and safe handling becomes especially important.
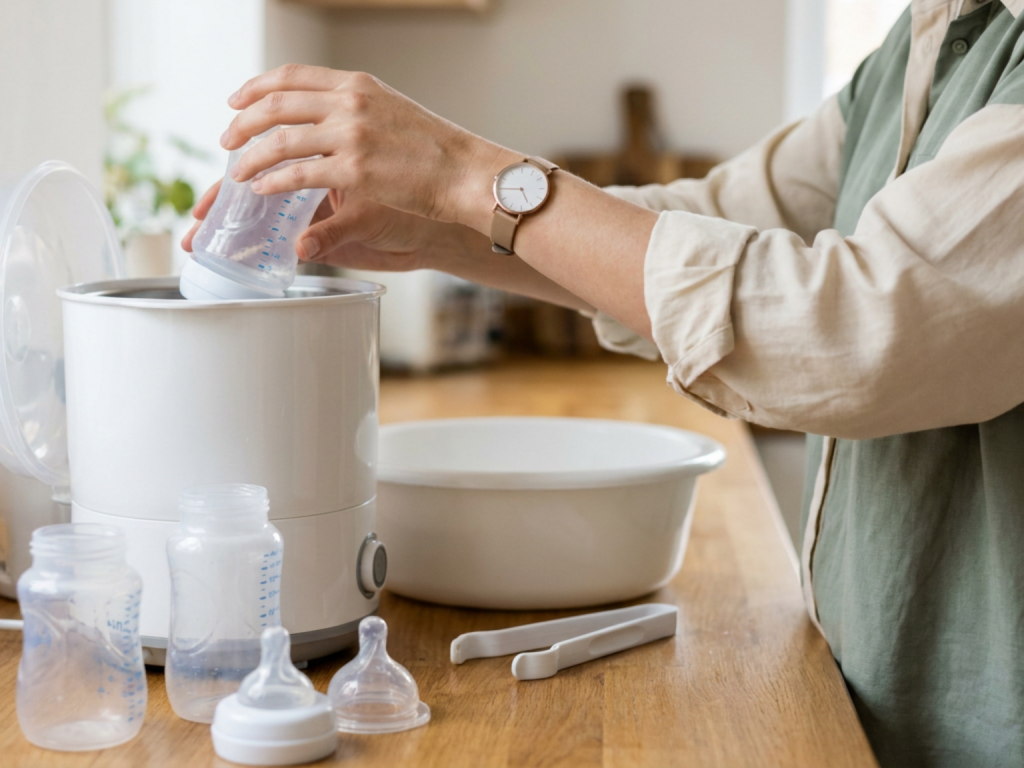
Clean bottles before any sanitizing method
Before using heat or a chemical sanitizing solution, wash every feeding item carefully. Start with clean hands and a clean work surface. Take the bottle completely apart: bottle, nipple, collar or ring, cap, valves, vents, straws, membranes, and any anti-colic components. Small pieces can trap milk and are easy to overlook.
For handwashing, rinse parts under running water, then wash in a clean basin reserved for infant feeding items rather than directly in the sink. Use hot water and dish soap, and scrub with a clean bottle brush used only for feeding items. Squeeze soapy water through nipple holes to clear residue. Rinse well under running water.
For dishwasher cleaning, confirm that each part is dishwasher-safe. Place small items in a closed-top basket or mesh bag so they do not fall onto the heating element or collect dirty water. Use hot water and, when available, a heated drying cycle or sanitizing cycle. If you use a dishwasher with heated drying or a sanitizing setting, this may both clean and sanitize items in many routine situations.
Wash bottle brushes and basins regularly too. A dirty brush can reintroduce organisms to clean feeding parts. Allow brushes and basins to air-dry completely between uses, because moisture supports bacterial growth.
Boiling method: simple and widely available
Boiling is a practical method because it does not require a special device. It works well for many glass bottles and heat-safe plastic parts, but always check the manufacturer’s instructions first. Some nipples, valves, and plastic components can degrade with repeated boiling.
- Wash all bottle parts first with soap and water.
- Place parts in a clean pot and cover them completely with water. Make sure there are no trapped air bubbles inside bottles or nipples.
- Bring the water to a rolling boil.
- Boil for 5 minutes, unless the manufacturer gives a different time.
- Turn off the heat and allow items to cool enough to handle safely.
- Remove parts with clean tongs or freshly washed hands.
- Place items on a clean, unused dish towel or paper towel in an area protected from splashes and dirt.
Avoid wiping the inside of bottles or nipples with a used kitchen towel. Even a towel that looks clean may carry microorganisms. Air-drying is safer because it reduces handling and contact with potentially contaminated fabric.
Steam sterilizers, microwave bags, and dishwashers
Electric steam sterilizers and microwave steam systems are popular in the US because they are fast and convenient. They use hot steam to sanitize washed bottle parts. Follow the exact manufacturer instructions for water volume, loading pattern, cycle time, cooling time, and how long items remain sanitized inside the closed unit. Overloading a steam sterilizer can prevent steam from reaching all surfaces.
Microwave steam bags or containers can be helpful for travel or small batches, but they can cause burns if opened too soon. Let steam escape away from your face and hands. Check that every component is microwave-safe; metal parts and some plastics are not appropriate.
A dishwasher can also be part of a safe routine. If the dishwasher uses hot water and has a heated drying or sanitizing cycle, it may be enough for many feeding items. Place small parts in a secure basket and load bottles so water can drain. If your dishwasher does not have heated drying, remove items with clean hands and let them air-dry fully on a clean surface.
For families managing frequent feeds, a mixed approach often works best: dishwasher cleaning for routine loads, steam sanitizing for higher-risk periods, and boiling as a backup if a device breaks or you are away from home.
Bleach-solution sanitizing: when heat is not available
A correctly diluted bleach solution can sanitize infant feeding items when boiling, steaming, or dishwasher sanitizing is not available. This method is useful during travel disruptions, after certain emergencies, or when heat could damage specific items that the manufacturer allows to be bleach-sanitized. Use plain, unscented household bleach. Do not use splashless, scented, thickened, or color-safe bleach products.
Public health guidance describes a dilute solution made by mixing 2 teaspoons of unscented bleach in 1 gallon, or 16 cups, of water. Prepare the solution in a clean basin. Submerge all washed bottle parts completely, making sure the solution touches every surface and passes through nipple holes. Let items soak for at least 2 minutes.
After soaking, remove items with clean tongs or washed hands. Do not rinse after bleach sanitizing if the solution was prepared correctly; rinsing can recontaminate the items. The remaining bleach breaks down as the parts air-dry. Place items on a clean towel or drying rack in a protected area and allow them to dry fully before storage or use.
Store bleach safely away from children, never mix it with ammonia or other cleaners, and ensure good ventilation. If you are uncertain about the bleach concentration or your baby has complex medical needs, ask a healthcare professional or local public health authority for guidance.
Drying and storing bottles without recontamination
Drying is not just a finishing step; it is part of infection prevention. Bacteria and fungi are more likely to persist in damp environments. After cleaning and sanitizing, place bottle parts on a clean, unused dish towel, paper towel, or dedicated drying rack. Keep them away from sink splash zones, raw food preparation areas, pet bowls, and bathroom surfaces.
Let parts air-dry completely before putting them away. If items are still wet and then sealed in a container, moisture can encourage microbial growth. Once dry, reassemble bottles if your routine and storage space allow, or store parts in a clean, covered container. Wash your hands before handling dry sterilized parts.
If you use a countertop drying rack, clean it regularly and let it dry. Replace worn nipples, cracked bottles, cloudy plastic, torn valves, or parts with scratches that trap residue. Micro-scratches in plastic can harbor debris, and damaged nipples may alter flow rate or pose a choking risk if pieces tear.
How bottle sterilization fits with formula safety
Clean bottles are only one part of safe feeding. Formula preparation, water safety, storage time, and warming practices also affect microbial risk. Families often focus on the bottle itself, but contamination can occur during scooping, mixing, cooling, storing, or reheating. If you use formula, it is worth reviewing How to prepare formula safely and How to store formula properly as part of the same hygiene routine.
In the US, commercially prepared ready-to-feed formula is the most sterile formula option before opening, while powdered formula is not sterile. This does not mean powdered formula is unsafe for most babies, but it does mean families should follow label instructions and pediatric guidance carefully, particularly for premature infants, infants younger than 2 months, and infants with immune compromise.
Do not warm bottles in a microwave because heating can be uneven and create hot spots that burn a baby’s mouth or throat. If warming is needed, use warm water around the bottle or a bottle warmer according to instructions, then swirl and test the temperature. Discard formula left after a feeding according to safe formula guidance because saliva introduced through the nipple can promote bacterial growth.
Safety cautions
- Do not skip washing before sanitizing; milk residue can protect microorganisms from heat or chemicals.
- Do not rinse bottle parts after correctly diluted bleach sanitizing, because rinsing can recontaminate them.
- Do not microwave bottles to warm feeds; uneven heating can cause oral burns.
- Do not use cracked, torn, or heavily scratched bottle parts, nipples, valves, or pacifier-like feeding components.
- Consult your pediatrician for individualized instructions if your baby is premature, younger than 2 months, immunocompromised, or medically complex.
Tools & Assistance
- A clean basin used only for infant feeding items
- A dedicated bottle brush and small nipple brush
- A dishwasher basket for small bottle components
- Clean tongs for removing hot or sanitized parts
- Your pediatrician, lactation consultant, NICU follow-up team, or local health department for special feeding questions
FAQ
Do I need to sterilize bottles after every feeding?
Not always. For many healthy full-term babies, thorough washing and complete drying are sufficient. Daily sanitizing is often recommended for babies younger than 2 months, premature infants, or babies with weakened immune systems.
Is a dishwasher enough to sterilize bottles?
A dishwasher with hot water and a heated drying or sanitizing cycle can sanitize many dishwasher-safe feeding items. Check the bottle manufacturer’s instructions and secure small parts in a basket.
How long should I boil baby bottles?
After washing, fully submerge bottle parts in water, remove trapped air bubbles, bring to a rolling boil, and boil for 5 minutes unless the manufacturer recommends a different time.
Can I use bleach to sanitize bottles?
Yes, when prepared correctly. Public health guidance describes 2 teaspoons of plain unscented bleach in 1 gallon of water, soaking washed items for at least 2 minutes, then air-drying without rinsing.
When can I stop sanitizing bottles daily?
Many families reduce daily sanitizing after early infancy if the baby is healthy and full-term, but timing depends on your baby’s risk factors and your clinician’s advice.
Sources
- Centers for Disease Control and Prevention — How to Clean, Sanitize, and Store Infant Feeding Items
- HealthyChildren.org / American Academy of Pediatrics — How to Sterilize and Warm Baby Bottles Safely
- NHS — Sterilising baby bottles
Disclaimer
This article is for general educational purposes only and does not replace medical advice. Consult your pediatrician or qualified healthcare professional for guidance specific to your baby.


Please log in to leave a comment.